Sunday, August 28, 2011

I Like Big Blocks and I Cannot Lie!


Cross Your Fingers Quilt
I like big blocks and I cannot lie!  You other quilters can't deny!  Ok....that's all I've got without offending people.  I'm calling this quilt the "Cross Your Fingers" quilt because that essentially what I did:  cut some fat quarters and crossed my fingers.  I was inspired by Jeni's recent quilt using vintage sheets and only one HUGE block.  I was going to do the same quilt, but I really wanted to use my 12 pack of Moda Crossweave fat quarters (from Pink Castle fabrics on etsy!) and I needed 16 fat quarters for Jeni's quilt.
Cross Your Fingers Quilt
I decided to make giant HST (half square triangles) instead!  I cut 17.5" squares from all the FQs, put it with a white 17.5" square, sewed 1/4" around all sides, cut diagonally, and POOF!  4 HST ready to go!  
Cross Your Fingers Quilt
Yeah, yeah, yeah, they're on the bias.  So what?  It all worked out fine!  See?  That finger crossing really does help! 
Cross Your Fingers Quilt
This is yet another item destined for the bazaar.....or my mom's couch if it doesn't sell! :)

Oh, and thank you everyone for all of your wonderful advice on my last post!

Thursday, August 25, 2011

Advice X2!

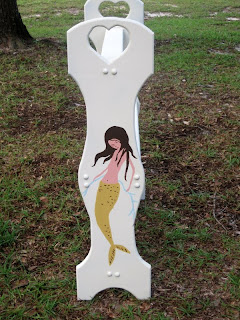
Ok, I need some advice on two projects!  I recently bought this quilt/comforter stand at Goodwill--for $6!!!!  It was forest green when I bought it, but two cans of ivory spray paint later and I had this:

It was a little too........country for me so I decided to add some hand-painting to the sides.


A Heather Ross Mendocino mermaid makes it much cooler, right?  My questions are (1) What should I paint on the other side?  the same mermaid?  the other mermaid?  an octopus? just fish? (2) Should I paint some fish or more seaweed on this side?  (3) Should I add some seaweed or fish to the slats in the middle?  I'm being very cautious because I'm worried this project could fall into "overkill" without meaning too.  I just want something cute and decorative to go in my sewing room and hold projects.

The skin color is a little too pink for me, but I had to work with the paint I had AND I painted this at night so my perception was a little off.  I could repaint the skin, but I'm not sure I hate it that much.  What are your thoughts?

I also finished this Lizzy House Magic Carpet quilt top!  I really love this color palette--it's new and different for me.  My question is, how in the world should I quilt this? Should I do different quilting in different sections?  I refuse to send my quilts out for quilting so it has to be something I can do at home.  I'm *really* tempted to free motion it, like I do everything, but I don't know if that's the best thing for it or whether I'm leaning on my crutch out of fear. 

Here's a shot of the appliqued circles.  

Sunday, August 21, 2011

Family Matters Table Runner Tutorial


A few months ago I made a table runner/topper like this for Amber in the Spicing Up the Kitchen Swap
SUTK table runner

I really loved how it turned out so I decided to do a brief tutorial on it!  Her version was somewhat scrappy, but this time I opted to use a number of prints from the same collection (Farmdale) and some coordinates.  The runner finishes at 18"x36" This would make a great housewarming or wedding present since you can personalize what you say in the middle--I love the idea of putting a newly married couple's last name on it!

Supplies:
  1. 102 2.5" squares.  I used 17 different prints and cut 6 of each (I had one extra)
  2. 10"x 24.5" solid for the center rectangle
  3. Heat'n Bond lite, or whatever you use to applique
  4. scraps for the letters--roughly 6" squares will work
  5. a generous 1/2 yard for backing.  The runner finishes at 18" so if your 1/2 is slightly larger, it will work.   Remember, you're trying to cover about 18"x36" 
  6. 3 WOF strips for binding--about 120" or so
  7. Batting


Cut out your squares.  This would also be a great project for left over jelly roll strips, charm squares, or layer cake pieces!

Clear some floor space and arrange the squares however you like.  You can wing it and skip this step, but I'm Type A and I hate when two of the same print end up next to each other.  Laying everything out helps your finished project look balanced color-wise.  You will lay three rows of 9 squares on each end and two rows of 12 squares on the top and bottom

Sew together your rows of 9 squares.  I'm only showing three, but you will have a total of six.  Press your seams however you like.  Sometimes I press mine open, sometimes I use my brain and figure out which direction to press alternating rows.  It's up to you!


Sew the rows of 9 squares together into a rectangle--it should be 3 squares across by 9 down.  You will have two of these.

Sew four sets of 12 squares, two for the top, two for the bottom. 

You should end up with four sections.

Sew the top and bottom pieces (12 squares long) to the top and bottom of your solid fabric rectangle.  Then, sew on the side sections.  For some reason, I forgot to take a picture after I sewed on the sides, but, trust me, I did it! :)

Trace out your letters onto the paper side of the Heat'nBond.  You MUST make sure the letters are backward!  I printed mine from Word using WordArt.  I chose Georgia as my font and I made sure the letters were around 6" high--you may have to do each letter separately since if you put the entire word in (1) your 11" paper won't be long enough and (2) the 6" will be from the top of the highest letter to the bottom of the lowest so the letters in between, in this case "ami" will be shorter than the rest.  I then took the print out and placed it under the Heat'nBond sheet and traced.  Easy peasy!  I then cut each letter out separately since I wanted to use different fabric for each letter.  Follow the instructions on your fusible product.  I ironed the letters onto the back side of the fabric I was using then cut them out.  

Arrange the letters so they are evenly spaced.  I used my acrylic ruler to be sure the bottom of the letters was level.

Applique the letters on.  I may do a video tutorial on this later.  I started to for this post, but my camera wasn't charged and I was too impatient to finish this project.  ha ha!  I used a zig zag stitch (stitch length 1 and width 3 on my machine), but you can use a blanket stitch or free motion near the edges like I did on my original version.  

Quilt and bind in your preferred method and you end up with something like this!  

I free motion quilted the patchwork areas and left the center free of quilting.  I machine bound this using invisible thread.


Enjoy!

Saturday, August 20, 2011

Custom Quilt Top Complete!

Mermaids, take two
I finished a custom order quilt top today!  The client saw the pink version I made a while back
Mendocino Mermaid Quilt complete!
She wanted one with the aqua/brown colors of Mendocino and wanted it a bit larger (to fit a full-size bed). I have to admit it was a little hard to cut into my stash of aqua Mendocino.  I know I'll never see more of it!
Mermaids, take two
I used Essex linen/cotton blend in Natural for my sashing this time because the client wanted to stay away from white.  I love the beachy feel of this!  I may suck it up and drive back down to the beach for a final photoshoot when this is done!
Mermaids, take two

Mermaids, take two
Now I have the unexciting task of piecing a back together.  This may be my least favorite part of quilting!  I'd rather iron than piece a backing!  

Friday, August 19, 2011

Inspired.....Er, Copied


I was sitting in the middle of a very messy sewing room feeling uninspired, but I wanted to make a quick something for the bazaar.  I was starting to get frustrated when I remembered seeing Tamiko's beautiful, simple quilt the other day.  Bingo!  I had a Kona charm pack and this was easily a project I could whip up in an evening.  Hooray!

I accidentally left out a whole row because it fell beneath my sewing chair, but, in retrospect, I'm happy it got left behind since it was another whole row of green and I think it would have been too much.
My natural instinct with rainbow quilts is to bind them in a grey or black--I've done this on two previous rainbow quilts.  For this one, however, I chose a solid red for binding because I wanted to keep the quilt gender neutral and still baby-ish.  I thought grey or black would seem too modern.

I am most happy with the back!  My hubby thinks I should display the quilt this way because he thinks its so cute (no he didn't use that word).  I traded for this old Alexander Henry print a long time ago, but I've never found the right project for it.  I knew I wanted it for a baby quilt backing, but I could never decide on a quilt top design that would match.  This was a perfect fit, literally!  I couldn't even trim an inch around after I finished quilting.  I used up every last centimeter of backing!  

Simple, fast, and satisfying, what more could you ask for in a project?


Sunday, August 14, 2011

Blissful Progress

Placemats and table topper
I made some progress on items for the October bazaar!  I completed 4 placemats and a table topper.  The table topper was made using English paper piecing the hexagons, sewing them all together, quilting, then binding.  I used the red, aqua, and pink prints from a Bliss candy bar plus some I had left over from my Marmalade quilt.  The placemats used the same color scheme from a Bliss charm pack plus I added some linen, hand stitching with pearl cotton, and red ric rac.  This was my first larger project with ric rac and I'm pleasantly surprised how easy it went!  I'm a little stuck about what to charge for items like these.  What I would pay for them and what typical buyers of handmade items would pay are different (I'm cheap and I'm surprised how much stuff sells for).  If anyone has any suggestions, I'm happy to hear it!  For now, I'm trying to look up similar items on etsy and see what they go for.  
Hexagon table topper
Placemats

Thursday, August 11, 2011

Ultra Special Wedding Quilt

001
Now that my best friend has received it, I can finally post pictures of my completed Bottled Rainbows quilt!  When I started this quilt it was for me and for fun (many thanks to Rachel for the QAL!).  I already had another quilt in mind to make my friend as her wedding gift, but as time went on, I didn't feel my original idea was special enough.  Then it hit me!  Duh!  I should make the Bottled Rainbows for her!  This is such a special quilt with so many special fabrics (not that she understands, but, whatever, I know they're special).  One block has special meaning for her (the pink one).  When my friend was getting back into the dating world after her divorce, she would journal about her dates and compare them to shoes.  I just KNEW I had to include some of the Heather Ross Munki Munki shoes in this quilt!
Bottled Rainbows completed
I opted to used a modified zig zag to quilt this one--mostly because I stink at straight line!  Since the blocks were quilt as you go, it didn't take long to do some minimal quilting over the seam lines.
Bottled Rainbows completed
I also machine stitched the binding down with invisible thread in the bobbin and light grey for the top--I sewed it to the back first then brought it around to the front.  I just started using this method for binding and I love how quick it is and how neat the binding still looks.  It's not as perfect as handsewing, but when I have a million projects on my plate, something has to give.
Bottled Rainbows completed
For the backing I chose an Alexander Henry butterfly print since the theme of her wedding was butterflies.  Really, that one was a no brainer!  The only downside I found was that because my backing had a light background, you can see the pressed open seams of the colored blocks.  I chalk this up to just one of the down sides to quilt-as-you-go.  It's still pretty from the front and I doubt anyone other than another quilter would be bothered by that. :)

Wednesday, August 10, 2011

10 Down, 20 to Go!

Pouches for upcoming bazaar

After much cursing, pricked fingers, and hunched shoulders, I finally finished these 10 wristlets for the bazaar in October.  I would like to make 20 more pouches--10 large boxy bags and 10 zippered pouches--so I still have a lot of work ahead!  These are from one of KeykaLou's patterns.  I chose the smallest size, but when I went to top stitch these, I regretted it!  Teeny tiny things just aren't my forte!

Pouches for upcoming bazaar

Tuesday, August 9, 2011

B*%$h, I Mean Beach, Photoshoot


Sea Glass quilt

I decided to drive to the beach today to take some pictures of the quilt I just finished.  I had the top done for some time, but I've delayed quilting it because I hate straight-line quilting and I HAD to straight-line this one.  I'm calling it Sea Glass because that's what it reminds me of.  Thus, I had to go to the beach for pictures.  Now, let me just say, I'm not a beach person.  I love the water, but I hate sand.  Ironically, I live near some of the most beautiful beaches (Destin, FL).  Well, today's photoshoot was a disaster!  I'll let you look at a few more pictures before I continue my story.
IMG_4948
Sea Glass quilt
Sea Glass quilt
Sea Glass quilt
Sea Glass quilt back
First off, I was coming from the gym so I was already a hot mess in long black pants and sneakers--not the best beach wear.  Also, I had to bring my youngest who is not quite 2 and loves the beach.  Imagine going to the beach with your kids and telling to stand in the hot sand and don't go near the water.  Yeah, that was fun.  Then, he proceeds to stick his hands in the sand and then rub his eyes.  FUN TIMES!  oh oh oh!  Let's not forget having to walk across the street and down the deck holding all my craft items and a hot, hungry kiddo.  Did I not mention it was lunch time?  Yeah, lunch time--it was freaking hot and we were freaking hungry.  Then, I put my pretty new quilt down on the dune for some texture with the plants growing in it.  MISTAKE!  The plants were actually weeds covered in stickers when then embedded themselves all over the back of my new quilt.  Lovely.
Here are some more pictures while you're laughing.
Love pillow
F, H, L pillow
I also decided to bring some older project to get some better pictures.  I mean, I was already going, I might as well make the most of my horrific time, right?
Crush pillow
This is my new pillow.  I love it.  I call it my Crush pillow since I have a complete crush on it.  Super soft voile and hand quilting...*sigh*
Close up of hand quilting
Closeup of hand quilting
Back of Crush pillow
Anywho!  My kiddo screamed and cried the entire time we were there--did you know that sand really likes to stick to tears and buggers?  Just something I picked up today.  After a frantic 10 minutes of snapping pictures, dodging tourists, calming a screaming baby and picking out stickers from my quilt, I ran to the car with my crying kiddo.  After dumping my projects in the back I managed to shake about a pound of sand off of my kiddo's face, clothes, and feet.  Cripes!  Give me concrete and a chlorine pool any day!
Related Posts Plugin for WordPress, Blogger...