Tuesday, October 18, 2016

Pillowcases {Plus Matching Pouch} Tutorial: How I Used My Stash Builder's Box


I'm a bit of a subscription box addict.  There!  I admitted it!  This is the first time I've tried the Stash Builder's Box and part of the reason I was drawn to it was because it includes 3 YARDS of fabric (3 one yard cuts).  So I decided to challenge myself to see what types of projects I can make using these three coordinating yards!

I received these three beautiful prints from Maureen Cracknell's Nightfall Parade collection.  Please note, not everyone receives the same prints, but they're all from the same collection.  Since I got some larger scale prints, I decided I needed a project to showcase Maureen's beautiful artwork!  Hello!  Pillowcases!  I realized I would have some fabric left so I also designed a matching zippered pouch to put the pillowcases inside--instant gift!!!!  Reality check: there are plenty of tutorials out there for pillowcases, so my method is my no means new.  Also, I do not prewash my fabric.  Pillowcases are very forgiving.  I've made over 50 and have never had an issue washing and drying them.  


Cutting instructions for pillowcases:

From Print 1 & Print 2 (main body of pillowcases and accent pieces) cut:
(1) 1.5"xWOF
(1) 27"x WOF

From Print 3 (cuffs)
(2) 9"xWOF

Trim selvedges off so each strip is 40"-42" wide.  The main idea is to get all the WOF pieces the same width, but without selvedges.  This width can vary slightly depending on the width of the fabric you are starting with.  I was able to trim off all the selvedges and each strip of fabric be 42" wide.  

Fold and press the 1.5"x42" (ish) strips in half longwise.  You should end up with two 3/4" x 42" strips.

Lay each 9" cuff strip down, face up.  Place the 3/4" accent piece on top, matching the raw edges. 


Next, lay the main body of the pillowcase RIGHT SIDE DOWN on top of the cuff and accent piece.  Pin.  For my pillowcases, I used opposite fabrics for the accent pieces and the main body.  Meaning, if the main body of the pillowcase was the owls, then the 3/4" accent strip was the bunny print.  


Gently roll/fold up the main body fabric until you can see the other side of the cuff.


Pull up the bottom of the cuff and pin to the existing layers.   The RIGHT side of the cuff should be touching the WRONG side of the main body of the pillowcase.  You should have one long tube with FOUR raw edges pinned on one side.


This is what they should look like before the next step.  You should only be able to see the WRONG side of the cuff fabric.  Everything else should be inside the tube.  

Sew down the length you have pinned using a 1/4" seam allowance.


Like this.  You don't have to be perfect.  Promise!


Pull out the fabric inside the tube.


It should look something like this.  It could probably use a little pressing at this point.  


See?  Cuff, accent, main body.  The raw edges are encased in the tube of the cuff.

See?  Two almost pillow cases!  Now we need to sew the side and bottom seams!  


Place the WRONG sides together, match up the side and bottom seams.  Pin. 


It should look like this before you sew!


Sew the one open side and bottom of the pillowcase using a 1/4" seam allowance.  Do NOT sew the top (cuff fabric side) closed!!! You need it open to actually put a pillow inside! :)  

Turn the pillowcase wrong side out.  Now the RIGHT sides should be facing.  Press to establish a nice side and bottom seams.  We are about to create a French seam and enclose those raw edges!


Using a 1/2" seam allowance, sew along the side and bottom, enclosing the raw edges (French seam).


Turn pillowcases right side out, trim any extra threads hanging out,  and you're done!


Now, to create a cute zippered pouch to gift your pillowcases!  All you will need is a 14" nylon zipper plus the remainder of Print 3.  Please don't use a metal zipper with this project!!!

From Print 3 cut:
(1) 14"x16.5" 
(1) 14"x5" 
(1) 14"x12"

Place zipper right side down on top of the right side of the 14"x12" piece.  You will be sewing it along the 14" top. 

Press fabric away from the zipper teeth and top stitch 1/8" from the edge.
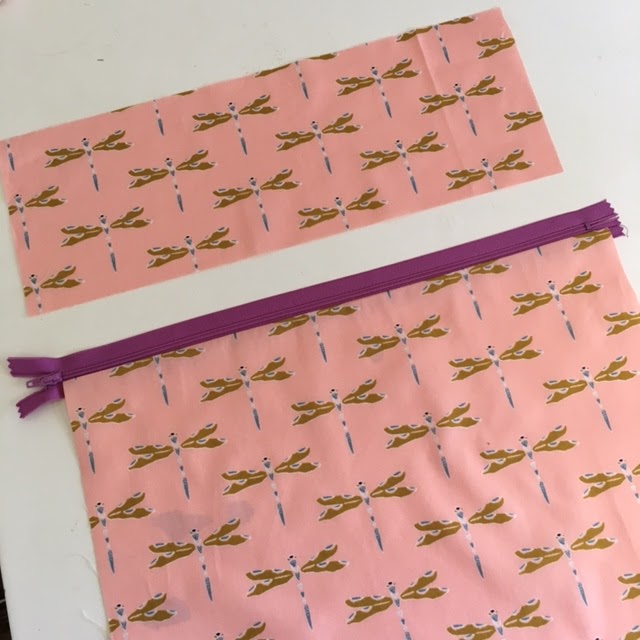
Now we need to attach the top part of the pouch to the zipper.


Place the 14"x5" piece right side down on top of the right side of the zipper.


Press the 5" piece away from the zipper and repeat the top stitching process. 


Place the zippered front unit on top of the 14"x16.5" back piece.  WRONG SIDES together.


Pin around all sides, matching raw edges.  If for some reason your zippered top piece is smaller than the back piece, just trim the back piece to match.  Open zipper half way before you sew! 

Sew around all four sides with a 1/4" seam allowance.  

Turn the pouch wrong side out and press.  Then repeat the French seam process we learned earlier by sewing all around the pouch using a 1/2" seam allowance!   

Turn pouch right side out through the open zipper.  

You're done!!!!  This is such a fast project it can easily be done in an afternoon!  It's perfect for birthday, teacher, or hostess gifts because you're creating your own wrapping and don't have to go foraging through the attic to find your solitary roll of non-Christmas paper.  Please tell me I'm not the only one who has to do that!!!  Please tag me on IG if you make this project @kelbysews and I'm sure @stashbuildersbox #iheartsbb would love to see too!


Friday, June 17, 2016

Let Them Piece Cake!


As the saying goes, "Let Them Piece Cake!".......or it would have gone like that had a quilter said it! Isn't this block adorable?!?!?  The lovely Lori Holt is at it again!  To celebrate the one year anniversary of the Vintage Farm Girl, she's teamed up with Fat Quarter Shop to bring y'all this yummy block!  Check it out for free HERE!!!!


I decided to make mine with some Cotton and Steel aqua and metallic gold for the cake, Anna Maria Horner Loominous woven for the middle icing, Anna Maria Horner Good Folks for the cake stand, Heather Ross Briar Rose for the heart, and Alexia Abegg Paper Bandana for the cut panda cake stand accent.  You can go crazy creative or sweet and traditional with this block!   How cute would this be for a birthday placemat?  Each member of your family could have their own, personalized for them!!! OMG!  I totally came up with that while I was typing and now I have new projects on my to-do list! 

Be sure to check out all the blogs below for more variations of this tasty block!

Kerry from Very Kerry Berry
Vickie from Spun Sugar Quilts
Sedef from Down Grapevine Lane
Erin from Why Not Sew?
Kelly from Kelbysews
Debbie from Happy Little Cottage
Renee from Sewn with Grace
Sinta from Pink Pin Cushion
Lisa from In the Boondocks
Dana from Old Red Barn Co.
Melissa from Happy Quilting
Kim from Persimon Dreams
Marni from Haberdashery Fun
Jacque from Lily Pad Quilting


Every cake stand needs pink pandas, right?  Please tell me it's not just me!

Monday, March 21, 2016

Friends of the Hour Basket


 I finally managed to create the extended version of my popular Hour Basket pattern!  The new pattern, called Friends of the Hour Basket, contains EIGHT basket options including the original size, a bucket style, and a tote bag!  Named after 7 of my sewing friends, come meet everyone!  You can purchase the pattern HERE.

The Darci: The largest basket size, it can hold two rolled, large lap quilts!


The Ali: a step up from the original Hour Basket, the Ali gives additional height as well as depth.  Shown here, it can store your layer cakes!

The Kelly: the original size Hour Basket

The Angela: while the same height as the original basket, this more bucket-shaped basket is perfect for Easter or Halloween!  Pattern includes dimensions and instructions for attaching a single handle.

The Elena: like the Kelly's petite friend.  This basket can hold a fat quarter bundle, but isn't meant for huge storage.

The Melanie: perfect for charm packs, scraps, or a thread catcher.

The Tracey: binding clips, sewing machine feet, and emergency chocolate will fit in the smallest basket


The Amanda: quick and easy tote for library books, groceries, or fabric (of course!)

Six of the baskets can even form a great set of nesting baskets!


Tuesday, October 20, 2015

Four Corners Fabric Tour

A little over 2 years ago I had the pleasure of meeting the sweet ladies (Liz and Elizabeth) from Simple Simon and Co. for the first time.  If you've ever met them in person you'll understand when I say there was laughter AND tears (the joyful kind).  Anywho! When they asked me to be apart of their blog hop celebrating their new fabric line, Four Corners, from Riley Blake, I happily agreed! 

When I got the fabric I squealed a bit--I mean, come on! Bright, graphic prints plus some metallic thrown in?  YUM! I decided to see where my sewing mojo took me and just began slicing and dicing! I thought I was making a mini quilt, but I ended up with a piece of fabric the perfect size for my Hour Basket!  Heads up, Pellon is coming out with a new fusible foam  soon called FF78F1 Flex Foam (which I used for this basket).  It ROCKS! 

The Hour Basket didn't use up much fabric from the fat quarter bundle I had so I decided to add a Lined Drawstring bag!  This orange-red cross print on light grey is my absolute FAVORITE from the line! 

I still had fabric left so I made a little zippered pouch with a curved bottom (just use a bowl to cut the corners into a round shape).  Loving the peek of metallic in the lining on this one!

Then, I decided I needed to use one of the border/panel prints to make something and wound up with a 30 minute pouch!  Seriously, the cross ended up perfectly centered without even trying! It was fate! 

This just goes to show you how far you can stretch a few fat quarters! I have an entire basket full of beautiful goodies plus fabric to spare!  Congrats on the great fabric line ladies!  Be sure to head over to Simple Simon Co for a chance to win some of this beautiful new fabric for yourself!


Monday, September 14, 2015

Triangle Imprint: 30 Days of Sewing with AGF


For those of you new to my blog, welcome!  My name is Kelly and I am half of the pattern design team at Hearts and Bees and I'm an avid Instagram user named "kelbysews"!  Ever heard of the One Hour Basket?  That's me! :)  When Art Gallery contacted me about making something with one of their new lines for 30 Days of Sewing with AGF, I immediately jumped at the chance to play with Imprint by Katarina Roccella!  I love love love these colors! They are feminine without being overly girly!  I was also impressed with how well these fabrics work in quilting, home-dec, and apparel sewing!  Super versatile!  Plus, if you have never worked with Art Gallery fabrics before, you simply MUST try them! They are amazingly soft and have a fantastic hand!

I wanted to find a pattern that would showcase the fabrics and play into their modern, fresh feel.  I thought this Sugar Loaf block by Wooden Spoon Quilts was a happy match!  The block is FREE on Craftsy!  I chose to alternate the triangle Sugar Loaf blocks with simple squares so you see hints of the designs in the triangles, but get full design in the squares.  

The only change I made to the Sugar Loaf pattern was to enlarge it to 6.5" unfinished (6" finished).  I simply did this during the printing process by increasing the scale.  I adore how it turned out!  The finished quilt is 42"x48" perfect as a small lap quilt or for your favorite toddler's bed!  Thanks for stopping by!!!  

This blog post was sponsored by Art Gallery Fabrics


Wednesday, July 29, 2015

Stash Fabrics Kona Blog Hop and Fleur Pattern!


I was so excited when Beth of Stash Fabrics asked me to participate in her Kona blog hop (read to the end for a coupon code and information on my giveaway)!  She asked me to choose my favorite 12-15 Kona colors for my very own bundle......I sorta chose 21 colors instead!  Ooops!  Sweet lady that she is, Beth went along with my pull!  Did you know she carries ALL KONA COLORS?!?!?!?  Yeah, me either!  Anywho!  I decided to use my (totally awesome) bundle to create a new pattern for Hearts and Bees called Fleur!

I am so in love with this quilt!!!!  I dragged it all over town trying to find the best shot!  People must have thought I was nuts!  This one was taken at the Civil War Battlegrounds in Franklin TN!  I stole a tourist to help hold the quilt! 

I pulled over on the side of the road to use these ratty old stairs that lead to some utility building.  I'm so classy! ha! ha! ha! You can really see the stellar quilting Crinkle Love did for us here!  

I absconded a jogger along the Harpeth River for this one!  Gotta love the South--you can ask perfect strangers to do weird things and they're totally agreeable!  

Like most of our patterns, there are two versions!  This is Ali's interpretation of Fleur!  I love it in Bonnie and Camille fabrics, but......

I am IN LOVE with this mocked up version she made with Denyse Schmidt's Hope Valley!  Oh!  It also comes with the paper pieced mini versions of both patterns!  Yeah, we're cool like that! 

So, don't forget to check out the other killer bundles along the blog hop and get 10% off your Stash Fabrics purchase with the code WOW303 through September 6th.  You know you want my awesome bundle!  Also, there is a great new Kona Club Stash Fabrics is starting soon to help build your stash!  If you sign up before September 1st you get a free color card!


July 17 – Darcy @ Modern Cozy
July 23 – Jacey  @ Jacey Craft
July 30 - Kelly @ Kelby Sews
August 3 – Nancy @ Owen’s Olivia
August 6 – Jodi @ Tales of Cloth
August 10 – Megan @ City Stitches
August 12 – Rita @ Red Pepper Quilts
August 17 – Elizabeth @ Andpins Handmade
August 19 – Tara @ Rad and Happy
August 21 – Sharon @ Color Girl Quilts
August 24 – Allison @ Allison Sews
August 27 – Kristi @ Schnitzel and Boo
August 31 - Jessee @ Art School Dropout


******GIVEAWAY!******  
I will be hosting a giveaway on my Instagram account for 2 mini charm packs of my Stash Fabrics Kona bundle and a free copy of Fleur!  Just find me @kelbysews on Instagram to enter (the post will go up around noon CST on 7/30)


Related Posts Plugin for WordPress, Blogger...