

A few months ago I made a table runner/topper like this for Amber in the Spicing Up the Kitchen Swap
I really loved how it turned out so I decided to do a brief tutorial on it! Her version was somewhat scrappy, but this time I opted to use a number of prints from the same collection (Farmdale) and some coordinates. The runner finishes at 18"x36" This would make a great housewarming or wedding present since you can personalize what you say in the middle--I love the idea of putting a newly married couple's last name on it!
Supplies:
- 102 2.5" squares. I used 17 different prints and cut 6 of each (I had one extra)
- 10"x 24.5" solid for the center rectangle
- Heat'n Bond lite, or whatever you use to applique
- scraps for the letters--roughly 6" squares will work
- a generous 1/2 yard for backing. The runner finishes at 18" so if your 1/2 is slightly larger, it will work. Remember, you're trying to cover about 18"x36"
- 3 WOF strips for binding--about 120" or so
- Batting

Cut out your squares. This would also be a great project for left over jelly roll strips, charm squares, or layer cake pieces!

Clear some floor space and arrange the squares however you like. You can wing it and skip this step, but I'm Type A and I hate when two of the same print end up next to each other. Laying everything out helps your finished project look balanced color-wise. You will lay three rows of 9 squares on each end and two rows of 12 squares on the top and bottom

Sew together your rows of 9 squares. I'm only showing three, but you will have a total of six. Press your seams however you like. Sometimes I press mine open, sometimes I use my brain and figure out which direction to press alternating rows. It's up to you!

Sew the rows of 9 squares together into a rectangle--it should be 3 squares across by 9 down. You will have two of these.

Sew four sets of 12 squares, two for the top, two for the bottom.

You should end up with four sections.

Sew the top and bottom pieces (12 squares long) to the top and bottom of your solid fabric rectangle. Then, sew on the side sections. For some reason, I forgot to take a picture after I sewed on the sides, but, trust me, I did it! :)

Trace out your letters onto the paper side of the Heat'nBond. You MUST make sure the letters are backward! I printed mine from Word using WordArt. I chose Georgia as my font and I made sure the letters were around 6" high--you may have to do each letter separately since if you put the entire word in (1) your 11" paper won't be long enough and (2) the 6" will be from the top of the highest letter to the bottom of the lowest so the letters in between, in this case "ami" will be shorter than the rest. I then took the print out and placed it under the Heat'nBond sheet and traced. Easy peasy! I then cut each letter out separately since I wanted to use different fabric for each letter. Follow the instructions on your fusible product. I ironed the letters onto the back side of the fabric I was using then cut them out.

Arrange the letters so they are evenly spaced. I used my acrylic ruler to be sure the bottom of the letters was level.

Applique the letters on. I may do a video tutorial on this later. I started to for this post, but my camera wasn't charged and I was too impatient to finish this project. ha ha! I used a zig zag stitch (stitch length 1 and width 3 on my machine), but you can use a blanket stitch or free motion near the edges like I did on my original version.

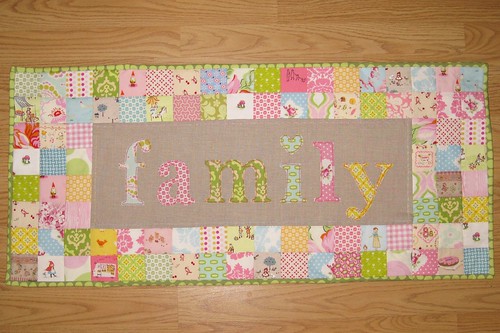
Quilt and bind in your preferred method and you end up with something like this!

I free motion quilted the patchwork areas and left the center free of quilting. I machine bound this using invisible thread.


Enjoy!
5 comments:
Sweet! I could see adding a few more rows of patchwork and making it into a wall hanging!
ADORABLE! Thanks so much for the tutorial. :)
Pretty! Now trying to think of who would appreciate this enough for me to cut out 102 tiny squares lol
I love this!!! I am looking forward to making this for my new home. I shared your link on my blog. I think I may make one that says LOVE for Valentines too.
I loved this idea, I turned them into wall hangings, making two. One with my last name for our living room wall and another with my parents last name in their wedding colors to give them for their 50th wedding anniversary. So excited to give it to them next weekend!!! Thanks for the inspiration :)
Post a Comment