
I know there are lots of zippered pouch tutorials out there, and they're great, but I haven't found one that explains how to make the ends of the zipper more finished. Once I figured out how to do this, I thought I'd share. This tutorial is more about the zipper ends than it is about the finished pouch. Though I am going to tell you how big I cut everything, you can easily make these pouches any size you want. I tried to take a lot of pictures, but if anything is unclear, please let me know!

Supplies:
(2) Exterior pieces, I cut mine 8.5" x 6.5"
(2) Lining pieces, mine are 8.5" x 6.25"
(1) 2"x4" piece of exterior fabric to cover the zipper ends
(2) pieces of medium weight fusible interfacing OR fusible fleece the same size as your exterior pieces. The interfacing you use will determine the feel of your pouch. The mid-weight interfacing, I used Decor Bond by Pellon, gives the pouch a bit more stiffness while the fleece will make the pouch more soft and pliable. ***UPDATE Shape Flex (SF 101) is what I use most often now. It bends nicely with the fabric since it's woven. You can also use it in conjunction with Decor Bond or fusible fleece.
(1) zipper--Mine is 7" The rule of thumb here is to have your exterior pouch length be 1.5" longer than your zipper. So in my case, the length is 8.5" so I used a 7" zipper.

Trim the corners of the fusible interfacing to reduce bulk and fuse to the exterior of your pouch.

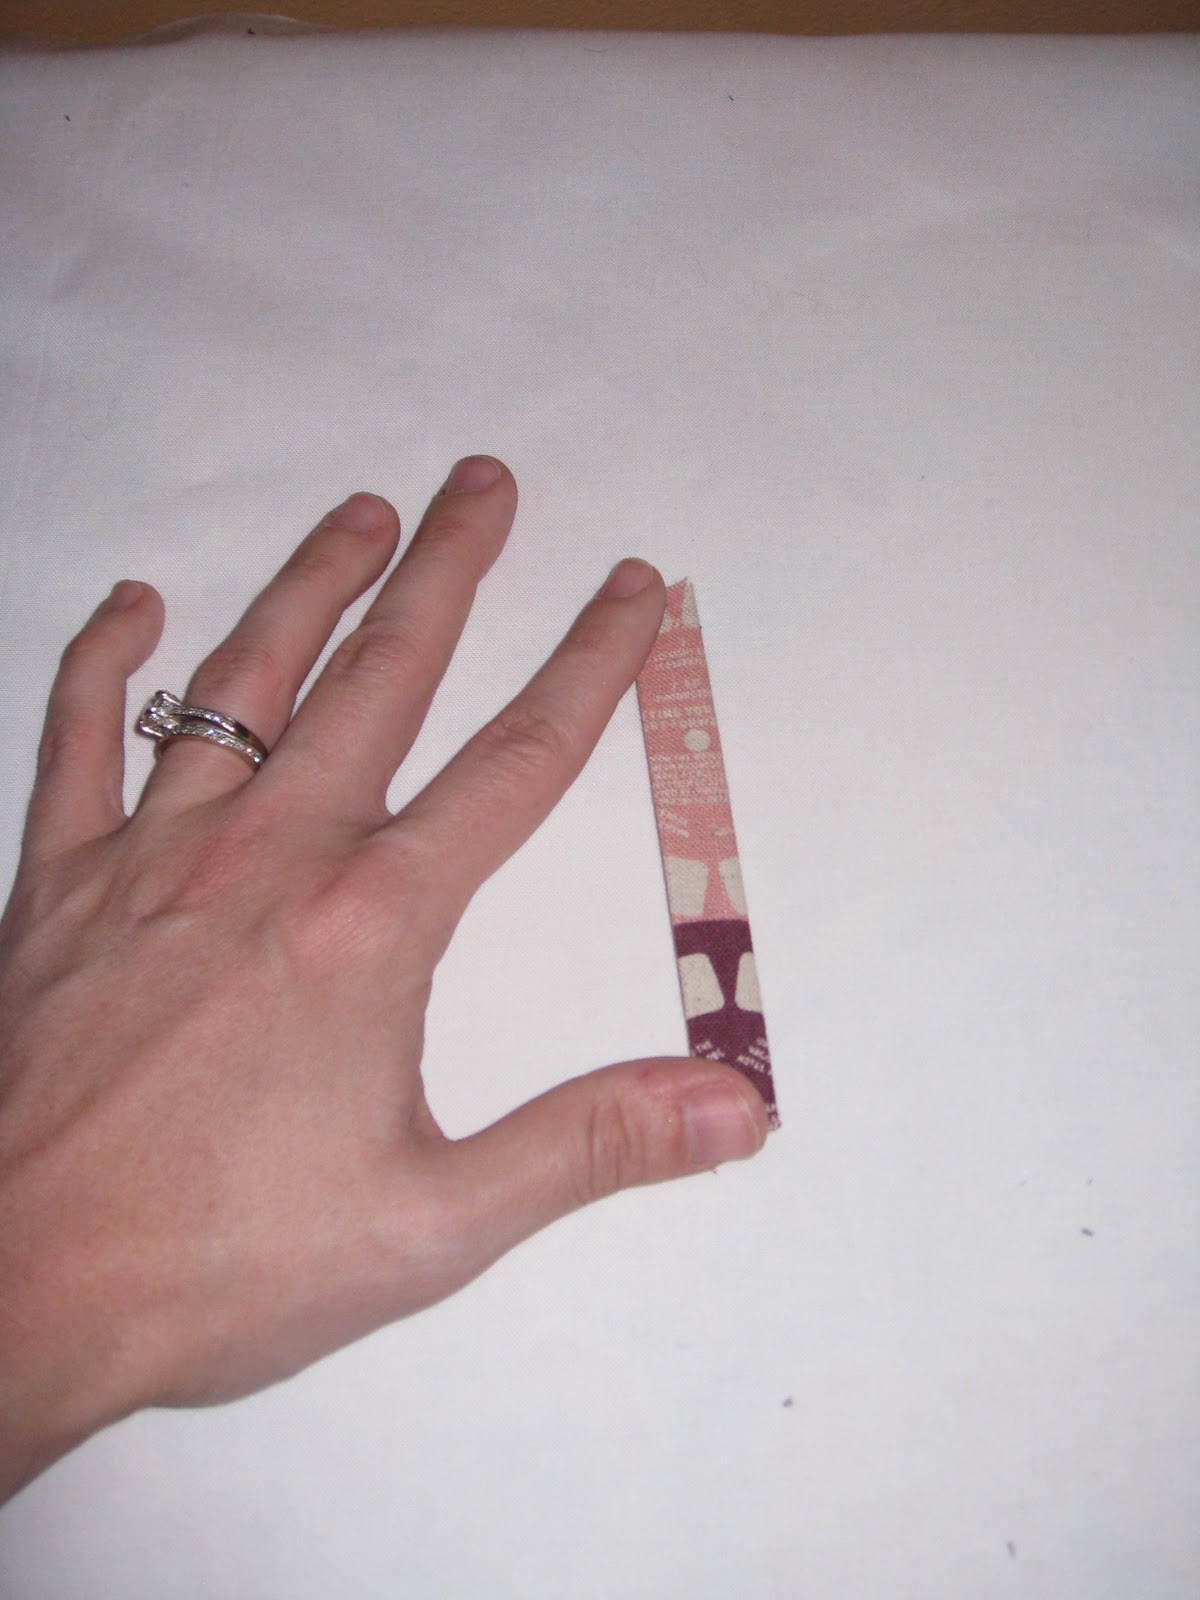
Trim the ends of the zipper to where the little "stoppers" on the zipper are.

Fold the 2"x4" piece of exterior fabric in half lengthwise and press.

Open it back up and fold in one side to the crease you just made and press.

Repeat for the other side.
Fold again along the original center crease and press.

Cut the skinny 4" strip in half to create two .5"x 2" pieces. Open up one piece and tuck one end of the zipper in.

See what I'm doing?

Sew about 1/8" away from the edge next to the zipper. You can try and use pins to hold the tab in place, but I found the piece to be so small that it's easier for me to hold it.

Repeat for the other side. This side will be a bit trickier since you will have to unzip the zipper and hold the two free pieces together as they would be when the zipper is closed. Again, you can try to pin, but I get better results (i.e. less shifting) by just holding it.

Trim the extra fabric away from the zipper tabs. You should end up with something like this.

With your lining right side up, place your finished zipper on top and center it. This is easy to do on your cutting mat--use the ruler markings to make sure it's even on both sides.

Place your interfaced exterior fabric right side down on top of the lining. See? Right sides together, sandwiching the zipper in between. There are other ways to attach the zipper to the fabric where you can actually see the zipper while sewing, but I like this method. If you want to do it another way, go for it!

Pin in place. You can see in this picture, it looks as if the lining has shifted a bit, but it is just from the pining along the top. The top edge is straight with the exterior, interior, and zipper lined up.

I'm not going to lie, this is the trickiest part. Put on your zipper foot, take a deep breath, and sew about 1/4" away from the top edge. You are essentially doing this Stevie Wonder style since you can't see the zipper, but you can feel it! The first 1/2" near the zipper pull is the hardest and you may have to tug on the end or push it through for a bit. Just go slow. Once you make it past the pull, it's really easy. I leave my pins in and sew over them. This, I have found, is critical to keep all three layers lined up. I have as yet to break a needle, but I have broken a few pins. I'd much rather risk a broken pin than bring out my seam ripper because my layers shifted.

You should now have something like this.

Use your iron to press the lining away from the zipper.

Press the exterior fabric down too.

To give the exterior a more finished look and to secure the lining from getting caught in the zipper, I top stitch the exterior about 1/8" away from edge near the zipper. I know I'm not using my zipper foot correctly here, but it worked so stop laughing! Truthfully, I'm never sure I'm using it correctly, I just do whatever works to get a zipper attached. Rules be damned!

Now it's time to attach your other lining and exterior pieces. You do this the same way you did before only now you have some fabric attached to your zipper. No biggie! Repeat my previous instructions on pining the layers and sewing on the zipper. Remember to top stitch the exterior on the other side, we want your pouch to look pretty!


It should look like this now. The next step is super important. Are you paying attention? Don't skip this part! If you've printed this out, highlight this part: OPEN UP THE STINKIN' ZIPPER! You will be cursing yourself and making best friends with your seam ripper if you forget that!

We're going to pin the exterior and lining right sides together, but first, we need to sort of fold/smush the zipper toward the exterior. See how I'm pinching it? Pinch it into place where everything is lining up--you can see how the top edges of the exterior fabric would line up if I squeezed them together, right? Pin that little guy in place! Continue pinning around all the edges.
UPDATE: You *can* do this step and have the zipper pushed toward the interior, I guess when I made this one I just found this way worked for me to keep things lined up. Since making this tutorial, I find myself always pushing the zipper teeth toward the lining instead. Maybe this pouch was a freak of nature, who knows! Feel free to experiment to find what works best for you!

Here's what it looks like all pinned together.

Starting in the middle of the lining, about 2" away from the corner, using a 5/8" seam allowance, sew a few stitches and back stitch. We are going to leave an opening in the lining so you need to secure the stitches so your pouch won't come apart when you turn it. I leave the pins in for this step too!

When you sew past the zipper/tab area, you may have to pull or push a bit since there are so many layers, just go slow. When you reach the exterior fabric, I sew slightly less than 5/8", more like 1/2", so that the lining will be a tiny bit smaller than the exterior and fit better into the pouch when I turn it. You don't have to do this. You can sew with the same seam allowance around the entire pouch.
**update--so you understand, sew very very close to the tab, but not through it.

When you get back to the lining side, leave a 3" opening or so for you to turn your pouch. Remember to backstitch at the beginning and end of either side of the opeing! Trust me, I know this from experience. If you fail to backstitch this bad boy can come part on you--the turning process can be rough on stitches!

Hi there! You will soon be pulling the entire pouch through that tiny hole! It's a bit like child birth. :)

But first! Clip your corners! Careful, don't clip your stitches!

Now push! he he! Push, pull, finangle, shimmey the exterior fabric through the open zipper and then through the hole in the lining.

Keep going. It's a messy job.

Whew! Now use something pointy, but not sharp, to push out the corners of the exterior fabric. Also use the tool to push out/up the finished ends of the zipper.

Wrinkly, but lookin' good! Now iron the lining down a bit.

Sew the lining hole shut. My raw edges naturally turned under once I turned it, but if yours don't, just fold them in and press then sew the opening shut. You can hand sew this closed if you care about seeing the stitching, but I don't. It's at the bottom of the pouch, a pouch that is meant to be used, so surely the stuff you put in it will hide the stitching, right? My thoughts exactly!

Yay! Tuck the lining inside and......

you're done!

See how pretty the ends are?

Now, what to put inside?
50 comments:
great tutorial!! not sure if I really want to try it or not, but you did a great job showing us how! thanks!!
Sweet. I am going to try this one day as I am zipper challenged :)
such a great tutorial Kelly... thank you! :)
thanks kelly! I love your trick for getting the zipper ends to look nice.
Fantastic technique with the zipper ends! (And a great tutorial presentation, too!)
Great tute kelly! I've always wondered why most other zippered bag tutorials don't address this.
I've been trying to get prettier zipper ends in my pouches (using those little fabric tabs), but mine don't look as good as yours because I think I don't make my fabric extend far enough past the zipper. Great tips. I have several bags to make in the next month, so your tutorial will come in handy!
LOVE this tutorial! I really wanted to know how to do zips this year - one of my goals and I can think of so many uses for little zippered purses to THANKYOU for a great easy tutorial I can follow!
Ohhh yay! Thanks twinnie!
This is the first zipper tutorial that I actually want to try. I've got a law degree that is going to waste and started quilting a year ago. It's great isn't it?
I love your tutorial! Thanks for the great pictures and step by step detail. I have sewn other pouches but as you said, the fabric detail on the zipper makes for a wonderful finish, off to the sewing machine I go....
Great tutorial! Thanks so much, I made one of these for my MIL using your tute. It's the best one I've made :)
Thank you for the great tutorial. I am confused about sewing the pieces together tho. I've tried another tutorial that was similar and I sewed through the tabs, i.e., all the way around edges except for the hole in the lining. When I did that, the lining was all funky at either end of the zipper. I found that if I stop sewing before the tabs and the jump over to the other side of the zipper and start sewing again, that doesn't happen. So are you supposed to actually sew all the way around and through the tabs?
I am trying to teach myself to put a zipper in, and this is the best tutorial I've found so far. Thank you so much!
Thanks for this awesome tutorial! I've been doing zip pouches for a while but my zipper ends (even with tabs) have always been a little off. I just gave this a try and it worked. (thanks especially for adding how much the difference between pouch pieces and zipper should be. That helped a lot! :)
Amazing zipper tutorial. I needed this o much as my zippers left a little to be desired! ;o)
Congratulations on a well written and illustrated tutorial! I'll certainly be using it. I also had a good laugh at your writing style. My husband who was reading it over my shoulder said 'it's the lawyer in you' and he reckons you were in corpaorate law not criminal defense.
Me and my pretty little pouch partner thank you for this tutorial! My first trial with my pattern left yickie zipper edges. This made it so much nicer. I know my partner will appreciate it! ;)
Thanks so much for this great tute, I always have issues with getting my zipper ends looking nice and tried this tonight - and it worked fab! I'll link it in my blog post tonight. I'm a new follower :-)
Finally! I get it!!!! Thank you!
I tried making my first zipper pouch a couple of weeks ago and hated the way the top corners turned out. Thanks SO much for this - think I'm trying it again this weekend using your method.
Thanks too for linking to this on Flickr.
Thank you for helping this all make sense! This is so much easier than I've seen before. Thank you for the time you spend doing this.
What a great tutorial! I just made my first one and I have two more cut out to make. I think I would like to do one a bit smaller, but I need to get some smaller zippers first. Super easy though! Thank you!!!
Fantastic - zipper fear is disappating...
woo hoo a tutorial that worked for me with the zipper ends -thank you thank you thank you! I am in the mouthy stitches pouch swap and have been panicking about how to make the zip ends look decent..... on my practice pouch using this tutorial they are great. Fingers crossed for the real thing!! x
Brilliant! I'm a novice at fabric crafting and I have been putting off making up a pouch because it has a zip. You've given me the confidence to try it. Thaks!
oooops, I forgot to open the zipper!!!
Thanks so much for the clear instructions. I've been looking for something like this for months! My zips were always bulky at the ends, but that won't happen anymore. Excellent photos and clearly explained, brilliant!
What does this mean?
"sew very very close to the tab, but not through it."
Are you sewing up to the tab, and then removing the pouch from the machine, and starting again on the other side of the tab?
Thanks!
Kelly, I used your tute to make a pouch and it turned out great. Thanks. I totally love the way the zipper is so neat and tidy. Thanks!
Thanks for a great tutorial. I just blogged about it.
Your Tutorial is just great! I have used it in my elephant pouch and it looks wonderful. I really like the simple way you have explain it:)
Great tute! I love the way you've done those ends and you explained it all really clearly :)
Thank you so much for this great zipper tutorial. Now when I sew my zippers on, I remind myself "Stevie Wonder Style", and giggle!
Thanks for the great tutorial! I am new to sewing and have made several zippered pouches from other tutorials. Each time I have disappointed when I turned the pouch right side out and the top corners/zip ends were all smushy. Finally, neat and tidy zip ends!!
Just wanted to let you know that your zipped pouch tutorial is my favourite! I've used it so many times. Thank you!
thanks so much
Thanks so much for the awesome tutorial!! You make it look easy! Or rather, I should say straight forward since I don't know how to sew. LOL The finished product looks fabulous and even a clueless, non-sewing craft addict like me followed it. Thanks for sharing your talent, and hopefully someday I will be able to make this myself -- or just bribe my sister who sews into making me one... :D
Thanks Kelly!
I like your tutorial alot.
I am a newbie in sewing pouches as I was apprehensive of sewing zips!
Your tutorial is fun to fo through and I am thankful for your tips esp.the one on having 1.5 " extra fabric than the zipper.
Great tip!
God bless you for your time in sharing with all!
Annie
Fr Singapore
THANK YOU KELBYSEWS!
I just finished making this bag for my little sister for Christmas. I made my own printed and painted canvas which I used ( made things a bit more difficult, but so worth it!) I am a SUPER beginner in sewing, and your tutorial covered all the details that most bloggers leave out. So easy even I could do it!
Thanks again!!
<3
Thanks for the tutorial!!!! Nancy
The little details make all the difference! I'm fairly new to sewing zipper pouches, and the small things -- like making the lining a quarter-inch shorter and giving yourself 1.5 inches for clean zipper ends -- helped me sew the best-looking pouch I've made so far.
Now I'm off to make some pretty, perfectly finished zipper pouches for Christmas ... :)
Thank you for the wonderful tutorial! I made 2 pouches today, one with raggedy zipper ends from a different tutorial and this one which turned out so much better!
These patterns are still my fav. I'm making this pouch and the boxy pouch out of some great green/pink Amy butler fabric as an auction item. Love the zipper end tutorial. Thanks!
thanks a million for a fantastic tutorial! i've learnt so much from this, am super grateful :)
Thanks for a brilliant tutorial - and for the updates you added too! I'm so glad I book marked it. 😊
I just made one of these little bags but I did not add those little tabs. Now that I am seeing this tutorial I have to say that those tabs are going to be added to my next one. My bag without the tabs still turned fine but the corners did not turn as nice. Those tabs give just that little bit extra that makes a big difference.
I have looked at several tutorials to make these little bags with the zipper tabs, and I think your tutorial is GREAT!!! Really good instructions and accompanying pictures. Thank you SO much for posting this, I have found it very, very helpful!
Thank you for making the zip ends understandable. I hated making zip pouches as my ends always got smashed up, weren't even and just looked bad. But this method of not sewing them is brillant. I've recently torn apart old purses and I see the zip ends are not sewn in them. It makes perfect sense. Thanks for taking the time for this tutorial.
I've made a bunch of these ranging in from size 8 x 6 to 18 x 20 inches for various knitting projects but I use only one piece for the front and one piece for the back. This means there are raw seam allowances inside. I either cover them with bias tape or a decorative embroidery stich.
Thank you for taking the time to make this tutorial. It is the best.
Post a Comment