


I'm a bit of a subscription box addict. There! I admitted it! This is the first time I've tried the Stash Builder's Box and part of the reason I was drawn to it was because it includes 3 YARDS of fabric (3 one yard cuts). So I decided to challenge myself to see what types of projects I can make using these three coordinating yards!

I received these three beautiful prints from Maureen Cracknell's Nightfall Parade collection. Please note, not everyone receives the same prints, but they're all from the same collection. Since I got some larger scale prints, I decided I needed a project to showcase Maureen's beautiful artwork! Hello! Pillowcases! I realized I would have some fabric left so I also designed a matching zippered pouch to put the pillowcases inside--instant gift!!!! Reality check: there are plenty of tutorials out there for pillowcases, so my method is my no means new. Also, I do not prewash my fabric. Pillowcases are very forgiving. I've made over 50 and have never had an issue washing and drying them.

Cutting instructions for pillowcases:
From Print 1 & Print 2 (main body of pillowcases and accent pieces) cut:
(1) 1.5"xWOF
(1) 27"x WOF
From Print 3 (cuffs)
(2) 9"xWOF
Trim selvedges off so each strip is 40"-42" wide. The main idea is to get all the WOF pieces the same width, but without selvedges. This width can vary slightly depending on the width of the fabric you are starting with. I was able to trim off all the selvedges and each strip of fabric be 42" wide.

Fold and press the 1.5"x42" (ish) strips in half longwise. You should end up with two 3/4" x 42" strips.

Lay each 9" cuff strip down, face up. Place the 3/4" accent piece on top, matching the raw edges.

Next, lay the main body of the pillowcase RIGHT SIDE DOWN on top of the cuff and accent piece. Pin. For my pillowcases, I used opposite fabrics for the accent pieces and the main body. Meaning, if the main body of the pillowcase was the owls, then the 3/4" accent strip was the bunny print.

Gently roll/fold up the main body fabric until you can see the other side of the cuff.

Pull up the bottom of the cuff and pin to the existing layers. The RIGHT side of the cuff should be touching the WRONG side of the main body of the pillowcase. You should have one long tube with FOUR raw edges pinned on one side.

This is what they should look like before the next step. You should only be able to see the WRONG side of the cuff fabric. Everything else should be inside the tube.

Sew down the length you have pinned using a 1/4" seam allowance.

Like this. You don't have to be perfect. Promise!

Pull out the fabric inside the tube.

It should look something like this. It could probably use a little pressing at this point.

See? Cuff, accent, main body. The raw edges are encased in the tube of the cuff.

See? Two almost pillow cases! Now we need to sew the side and bottom seams!

Place the WRONG sides together, match up the side and bottom seams. Pin.

It should look like this before you sew!

Sew the one open side and bottom of the pillowcase using a 1/4" seam allowance. Do NOT sew the top (cuff fabric side) closed!!! You need it open to actually put a pillow inside! :)

Turn the pillowcase wrong side out. Now the RIGHT sides should be facing. Press to establish a nice side and bottom seams. We are about to create a French seam and enclose those raw edges!

Using a 1/2" seam allowance, sew along the side and bottom, enclosing the raw edges (French seam).

Turn pillowcases right side out, trim any extra threads hanging out, and you're done!

Now, to create a cute zippered pouch to gift your pillowcases! All you will need is a 14" nylon zipper plus the remainder of Print 3. Please don't use a metal zipper with this project!!!
From Print 3 cut:
(1) 14"x16.5"
(1) 14"x5"
(1) 14"x12"

Place zipper right side down on top of the right side of the 14"x12" piece. You will be sewing it along the 14" top.

Press fabric away from the zipper teeth and top stitch 1/8" from the edge.
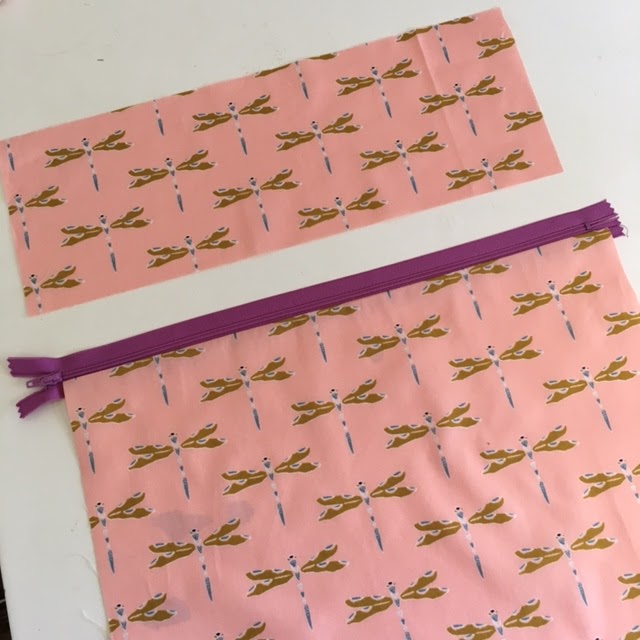
Now we need to attach the top part of the pouch to the zipper.

Place the 14"x5" piece right side down on top of the right side of the zipper.

Press the 5" piece away from the zipper and repeat the top stitching process.

Place the zippered front unit on top of the 14"x16.5" back piece. WRONG SIDES together.

Pin around all sides, matching raw edges. If for some reason your zippered top piece is smaller than the back piece, just trim the back piece to match. Open zipper half way before you sew!

Sew around all four sides with a 1/4" seam allowance.

Turn the pouch wrong side out and press. Then repeat the French seam process we learned earlier by sewing all around the pouch using a 1/2" seam allowance!

Turn pouch right side out through the open zipper.

You're done!!!! This is such a fast project it can easily be done in an afternoon! It's perfect for birthday, teacher, or hostess gifts because you're creating your own wrapping and don't have to go foraging through the attic to find your solitary roll of non-Christmas paper. Please tell me I'm not the only one who has to do that!!! Please tag me on IG if you make this project @kelbysews and I'm sure @stashbuildersbox #iheartsbb would love to see too!

