Showing posts with label zipper pouch. Show all posts

Tuesday, December 13, 2016

Curious Dream Blog Hop {and Giveaway!}


I'm going to do my best not to make this post too sappy, so forgive me in advance if I fail.  I found out around a year ago that my friend Angela was designing a fabric line.  I was secretly thrilled I was one of the few people who got to peek in on her process:  agonizing on which prints were best, indecision on exactly what shade of blue was just the right one,  etc.  I was {almost} as excited as she was when Windham Fabrics picked up her line, Curious Dream!  I mean, come on! This is the same fabric company that has artists like Heather Ross and Lotta Jansdotter!  It is unbelievably rewarding to witness a friend's dream come true.  I am so proud of her and all the hard work that went into this collection, inspired by Alice in Wonderland.  I HIGHLY recommend browsing her stunning look book for this collection.  It is jaw dropping! 

So what happens when one of your good friends designs a fabric collection?  You get mail like this!!!!  Then you realize you actually have to open the bundle and cut the pretty, pretty fabric......  drat!  I'm not going to lie, the timeline for the blog hop wasn't great for me.  I had my own deadline for 9 (yes, NINE) quilts to complete, but I was not going to miss out on a chance to create something with this beautiful collection and SHOUT about how stinkin' happy I am for Angela!!!  She always teases me about how fast I am so I needed to live up to the hype!  I created 3 different projects with Curious Dream!

First up is a simple patchwork pouch.  I love making little pouches like this!  You don't need much fabric and it's a fun way to showcase the entire collection, especially that little rabbit who is a personal favorite of mine.

Hi sweet rabbit!!!


Next is a Jane Market bag.  This is a classic grocery tote shape and always a huge hit as a gift around the holidays. 

I am OBSESSED with the Alice patchwork print!  Hello bags and backing!!!  

I used it here as the middle accent pocket and used another Windham collection, Twilight, for the navy print in the body of the bag. 

For the lining I used two of the lock/heart lock prints.
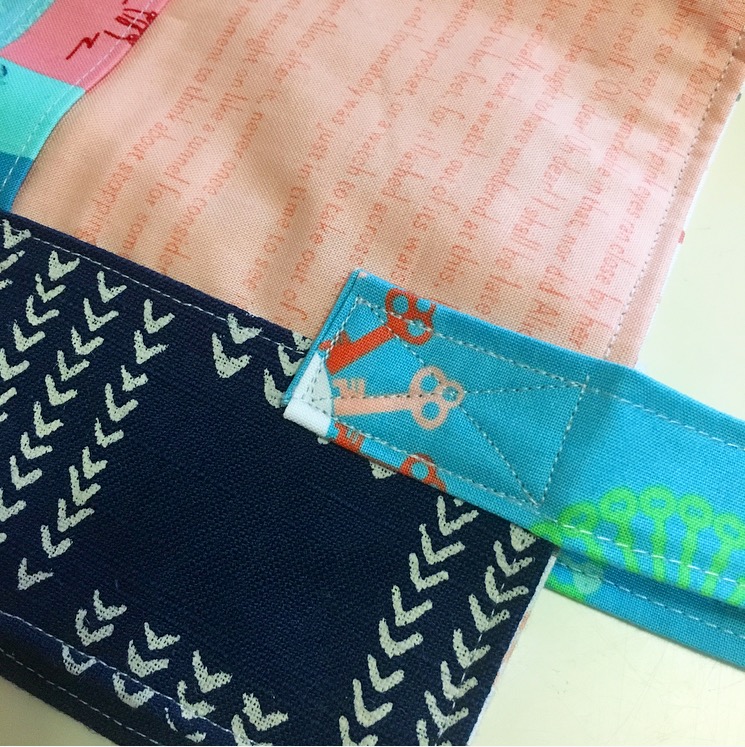
For the straps I used one of the "key" prints.  Love the lock and key theme!!!

 Last up is a mini quilt.  I thought what could be more "Alice" than a wonky 9 patch! 

 This being the real world, I will admit I messed up my 9 patch shuffle in my excitement to finish, but I love the results all the same!


Now, for the fun part!!! I'm giving away a FAT QUARTER BUNDLE of Curious Dream!!!!  All you have to do is leave a comment.  Maybe tell Angela how awesome her fabric is.  Just a suggestion! :)  If you want to enter another giveaway, hop on over to my IG account @kelbysews to enter for a chance to win one of the items I made with Curious Dream! 


Thank so much for joining me on the blog hop!  Be sure to catch all the stops for more fun Curious Dream projects and more giveaways!  

Curious Dream Blog Hop Stops 
Monday, December 12th – Windham Fabrics: https://windhamfabrics.wordpress.com/
Tuesday , December 13th – Kelly Bowser –Kelly Sews  http://www.kelbysews.com/
Wednesday, December 14th – Brooke Sellmann- Silly Mama Quilts http://www.sillymamaquilts.com/
Thursday, December 15th - Wendy Sheppard -Ivory Spring  https://ivoryspring.wordpress.com/
Friday, December 16th – Becca Bryan – Bryan House Quilts  http://bryanhousequilts.com/
Saturday, December 17th –  Chris Dodsley- Made by ChrissieD  http://madebychrissied.blogspot.com/
Sunday December 18th – Aurifil - https://auribuzz.wordpress.com/
Monday, December 19th-  Jennie-  Clover & Violet http://www.cloverandviolet.com/
Tuesday, December 20th – Stephanie Kendron – Modern Sewciety  http://www.modernsewciety.com/
Wednesday, December 21st – Joanne from  The Fat Quarter Gypsy – http://www.thefatquartergypsy.com
Monday, December 22nd – Heidi Staples – Fabric Mutt  http://fabricmutt.blogspot.com/
Friday, December 23rd – Round up post at Windham Fabrics https://windhamfabrics.wordpress.com

Winners announced Friday, December 23rd!


LinkConnector Validation

Tuesday, October 20, 2015

Four Corners Fabric Tour

A little over 2 years ago I had the pleasure of meeting the sweet ladies (Liz and Elizabeth) from Simple Simon and Co. for the first time.  If you've ever met them in person you'll understand when I say there was laughter AND tears (the joyful kind).  Anywho! When they asked me to be apart of their blog hop celebrating their new fabric line, Four Corners, from Riley Blake, I happily agreed! 

When I got the fabric I squealed a bit--I mean, come on! Bright, graphic prints plus some metallic thrown in?  YUM! I decided to see where my sewing mojo took me and just began slicing and dicing! I thought I was making a mini quilt, but I ended up with a piece of fabric the perfect size for my Hour Basket!  Heads up, Pellon is coming out with a new fusible foam  soon called FF78F1 Flex Foam (which I used for this basket).  It ROCKS! 

The Hour Basket didn't use up much fabric from the fat quarter bundle I had so I decided to add a Lined Drawstring bag!  This orange-red cross print on light grey is my absolute FAVORITE from the line! 

I still had fabric left so I made a little zippered pouch with a curved bottom (just use a bowl to cut the corners into a round shape).  Loving the peek of metallic in the lining on this one!

Then, I decided I needed to use one of the border/panel prints to make something and wound up with a 30 minute pouch!  Seriously, the cross ended up perfectly centered without even trying! It was fate! 

This just goes to show you how far you can stretch a few fat quarters! I have an entire basket full of beautiful goodies plus fabric to spare!  Congrats on the great fabric line ladies!  Be sure to head over to Simple Simon Co for a chance to win some of this beautiful new fabric for yourself!


Wednesday, May 14, 2014

30 Minute Pouch Tutorial


I recently made a bunch of these pouches for an upcoming event and I thought I'd share how!  These are super quick and easy and are perfect for teachers gifts, last minute gifts, or as a cute way to hold gift cards.  They will really only take 30 minutes!  Promise!  I timed myself! 

You can find this tutorial for PDF download on Etsy.


  As you can see, the pouch is large enough to carry most cell phones.

It's a quick and simple pouch!


Tuesday, December 17, 2013

Sweat Shop

I've been hard at work lately between gifts and finishing up custom orders!  One of my favorite go-to gifts are these voile/velveteen infinity scarves!  Anna Maria Horner has a great tutorial on her blog, though I use different measurements since I find hers a bit bulky.  For mine, I use one yard of voile and one yard of velveteen to get TWO scarves.  I cut two pieces of velveteen 13"x36" then sew together along the 13" end to get a 13"x72"ish piece.  Repeat with the voile.  Then follow Anna Maria Horner's instructions!  Well, I also sort of cheat and machine stitch everything closed with invisible thread.  Shhhhhh!  Don't tell anyone I'm too lazy to hand stitch!

Dobby voile and leopard velveteen scarf done!

Purple velveteen/voile scarf done!

Last one for the night!

Infinity scarves + totes on clearance at Old Navy= teacher gifts done!!!
Then I put all the scarves in some totes I got on clearance at Old Navy.  Voila!  Teacher gifts!

Quilted, bound, washed, dried, and ready to go to it's new home! Experimented with three separate quilting styles on this. Sadly, the tension wasn't great on one method. Hopefully the person who receives it won't care! #nobodyisperfect
I also finished this quilt, which has been partially quilted for months, and gave it to my friend, Ryan, because he's cool and I just felt like giving it away.  :)

Finally framed the mini Dresden @insidethepaperbox made me! I painted the matting of a frame on clearance at Pottery Barn.
Jessie made me this mini dresden forever ago and I finally found the perfect frame for it……after I painted the matting that awesome color!  Can't wait to hang this up!

3 boxy bags done! Birds are a gift, deer is for @rachelgriffith and middle text one is for sale.
A few more boxy bags for gifts!

@libertylondon trees done!!!! @crazymomquilts pattern is my favorite!
Some Liberty Christmas trees as gifts for special ladies!


Thursday, June 27, 2013

Craftsy Class Giveaway!!!!


I'm sure most of you have heard of Cratsy, but if you haven't you MUST check it out!  I SOOOOO wish this was around a few years ago when I was clumsily teaching myself how to sew through blogs and tutorials! You can take classes on how to make quilts, bags, garments, etc.  There are even non-sewing related classes like cake decorating, paper crafts, knitting, and crocheting!  Classes are much less expensive (some are FREE!) than you can find at your local shop and you can take them in your pajamas! 

Anywho!  I got to try out Tara Rebman's new Quilt as You Go Patchwork Bag Class and now I'm giving away this pouch I made using her method along with her class to one (lucky!) person!  
Tara's class is super easy to follow and is a great introduction to quilting and bag making at the same time!  She is a fabulous instructor!

Tara teaches you her easy method to create her adorable Tinker Tote bag:

And a sweet clutch!


Aren't they cute?????  Perfect for the summer!  All you have to do is

If you have a Craftsy account already, just use your login information.  If not, signing up for Craftsy is free! Only one entry per person and you have until Thursday, July 4th to enter!


Wednesday, December 19, 2012

Basic Zipper Video

A bit of pouch making going on this afternoon.
I made a few last minute gift pouches and I thought I'd share a quick little video tute on how I attach a zipper when I'm NOT using zipper tabs.  A few additional tips for how I make pouches
1.  I like to use a linen blend or home dec weight for the exterior.  It's not necessary, but they come out much nicer
2.  I use Shape Flex for interfacing on the EXTERIOR only.
3.  After the sides of the pouch are sewn together, I clip the corners if I'm making a square pouch and clip curves if I'm making rounded corners.
4.  I use a longer stich (3.0 setting on my BabyLock) to topstitch than I do to assemble the pouch.
5.  For this video and the pouches sewn, I used a 7" zipper, but the zipper tape was 8.5" long.  My fabric was cut 8.5"x6.5"
6.  Other than when I attach the zipper, I use a 3/8" seam allowance when assembling the pouch.
6.  I purchase all my zippers from ZipIt on Etsy

A few more zippered pouches because I was bored.

More zipper and lining action from today's endeavors!

Here's the video!  If there is enough interest in a longer version, I could probably show one from start to finish, but I feel there are lots of great tutes out there already.  It's usually just the zipper attachment people struggle with or fear so that's what I focused on.


Tuesday, January 3, 2012

My FQ Bundle, Stuff, and a Giveaway

For those of you who haven't heard, Laura at Quokka Quilts is holding a little, er, big, design-your-own-FQ-bundle contest!  The winner will receive not a FQ bundle of their fabrics, but 1/2 yards!  I'll pause why you all go check it out and create your own bundle........done yet?  Anywho, this is mine!

1. Kona Ash
2. Kona Melon
3. Bella Navy
4. Taza Neutral Tarika
5. Cape Ann Cotton Sunset Pink Ginkgo Toss 
6. Oval Elements Mood Indigo 
7. Ruby Grey Sundae
8. Outfoxed Coral Fern Stripe
9.  Weekend Clubhouse 2012 Navy Random Pencil Check
10. Puttin' on the Ritz Grey Princess 
11. Oval Elements Sweet Pea
12. Going Coastal Navy Sea Star
13. Puttin' on the Ritz Grey Gingham 
14. Ruby Sherbet Sundae
15. Weekend Clubhouse 2012 Navy Block Toss Yardage

I was going for a modern nautical vibe.  I keep wearing (and buying) all these striped shirts like I'm going to go sailing any minute.  Um, yeah, I've only been sailing once.  Now my problem is that I want to buy all these fabrics and make something! 

I forgot to share this earlier, but while on vacation I managed to stitch up these little macaroons!  Designed by the talented Ashleigh and Amanda of The Frosted Pumpkin Stitchery.  They even have a dessert of the month club starting this month and the patterns are on SALE right now!  Hurry and sign up, I sure did!  These ladies are making cross stitch cool with their fresh designs.  These are such great projects to take on a long trip, on the go, or to snuggle up on the couch and relax with!  They even have a Hoop Travel Bag pattern that is the *perfect* size for hoops on the go!  I made two already (sorry, not the best picture, these were my last few sewn items of 2011)


I made one from Ruby Star Rising tea cups and view master reels and one from Heather Ross Far Far Away II and III.  These pouches were a life saver on my trip!  I never had to find where I put my scissors or worry about little hands making off with my floss.  Everything was always together and accessible.  Amanda has graciously allowed me to give away a copy of her Hoop Travel Bag pattern!  Just leave a comment to win!  I'll pick a winner on Monday, January 9th.

My Flickr twin (not IRL), Amy, and I decided to do a little Christmas swap.  We both ran late so it ended up being a New Year's swap. :)  I wanted some pot holders and she wanted a pillow.  That was the only real instruction we gave each other.  I got these stunning AMH potholders!  I'm torn between wanting to use them and wanting to kill anyone who tries to take a roast chicken out of the oven with my new mitt! :)  Now, when I opened her package, after the obvious shout of joy, I began laughing because I had this pillow:

halfway done already!  Seriously, we had no idea we were creating items so similar!  It's spooky!  I made this with AMH Innocent Crush and Essex linen in Natural.  The HSTs measure 1.5" finished.  The binding is some of AMH's premade bias binding, which I love!  It's so nice to be able to grab something premade than shuffle through my stash and make some!  


I'm also playing catch up on some bee blocks.  This one is for Sarah in the Twice Around the Block bee.  She asked for any kind of star that finished at 12".  I made a wonky star inside a traditional star.  If you want to make this you will need: (4) 3.5" solid squares , (4) 3.5" print squares, (4) 3.5"x6.5" solid rectangles, and (9) 2.5" solid squares. I used the scraps from making the flying geese to make the wonky star in the middle so there is very little waste of your prints.

Whew!  I'm tired.  That was a much longer post than I anticipated!  Thanks for sticking it out! :)

Sunday, December 18, 2011

New Things (and Procrastination)

Pencil pouches
Pencil pouches
I'm supposed to be finishing a quilt that my sister in law asked me to make for her nanny, but instead I'm making these.  My oldest helped piece the solids version.  He wanted to give it to his Shelf Elf, but changed his mind and decided to keep it--ha ha!  You can find the tute here


I made these two pillows a while ago, but forgot to blog about them, oops!  These were a custom order from one my Facebook followers.  I really love how the "love" one came out!  The background is Moda crossweave in blue/white.  The "ward" one is Kaufman's quilter's linen.  Both appliques are white felt.  
This is another one I forgot to blog about!  Some friends of mine received some bad news--the kind of news where there are no words of comfort--so I decided to make a quilt for them.  This one took me only 2.5 days from start to finish since I was extremely focused on getting something to them quickly.  I was super happy with the results.  I love simple patterns, they have such a clean look!  This pattern can be found here.


Thursday, November 3, 2011

Pretty Little Pouch--Round 3!


Michelle and I run a little swap on Flickr called the Pretty Little Pouch Swap.  This round my partner had very definite style and color-scheme preferences and I tried to oblige with this!  I used some linen, some Ruby, and some not-yet-released Walk In The Woods (which Kelly S. scored for me at Quilt Market!).  In retrospect, I wish I would have appliqued little Red down too, but I was a bit nervous about appliquéing something so thin.  Also, I forgot to use stabilizer when making the tree, so there are puckers there.  Luckily I remembered before I did the leaves, fox, and path!

For the back I used left over squares of Walk In the Woods and appliqued some hearts and used a little hand-stitching.  Why do I my pouches for this swap have linen and hand-stitching?  I'm in such a rut!  At least I didn't make another rainbow!
For the inside, I used almost all my little Walk In The Woods squares to create a lining.  Fun, right?

This is the whole package that will be making it's way to my partner tomorrow!  Hope she likes it!


Related Posts Plugin for WordPress, Blogger...